I haven’t met anyone who loves going through the whole job search process — researching job postings, writing cover letters, networking at events, conducting phone screenings and onsite technical interviews, and, finally, going over negotiations and starting the new job. It’s overwhelming. I cannot change this process, but I can help people with one of the most ‘unnatural’ parts — the technical interview.
Over the past 2 ½ years, I’ve collected whiteboarding questions and I’ve taught Whiteboarding Prep for Girl Develop It, where I pair students to be the interviewer and the interviewee. What I’ve learned is that people tend to practice and prepare for technical interviews by sitting alone, reading the problem and taking their time to solve it, or solving the problem on an online platform. However, many companies still use whiteboards for technical interviews, which involves a completely different skill set.
What is needed to practice whiteboarding?
- Another person
- A whiteboard (window or mirror) and markers, or paper and pen
Most people can get the materials, but it can be hard to get someone to come over to your house and just tell you whiteboarding problems. Wouldn’t it be great to have a virtual assistant who could act as your interview partner? That’s when I decided to try building one using Actions on Google.

I had the following requirements for my Action:
- Tons of problems/challenges
- Problems ranging from easy to hard (at least 3 for each type/level)
- Hints for each problem
- Solutions
I have a large list of problems and solutions in a Github repo — all I’m missing are the hints for each problem, which I can add.
I had some tech requirements:
- Available on tons of devices (accessible)
- Easy for users/students to get to and find
- Easy for the users/students to use
- No downloading (or, at least, low bar for entry)
- Has audio-only & visual-only capabilities to accommodate various devices and users’ abilities
- Has a friendly, conversational feel
- Handles natural language processing (eek!)
- Be able to link to solutions on Github
- Has Analytics to see how it’s being used
I ended up using the following tools:
- Actions on Google — the platform
- AoG Client Library — a sweet Client Library in JavaScript that makes it easier to write for the platform
- Node.js — JavaScript framework
- Dialogflow — a conversational platform powered by AI
- Cloud Functions — Firebase — my Action is deployed on Cloud Functions, where all I need are my functions. This tool automatically runs backend code in response to events triggered by Firebase features and HTTPS requests (no need to build out a full backend!)
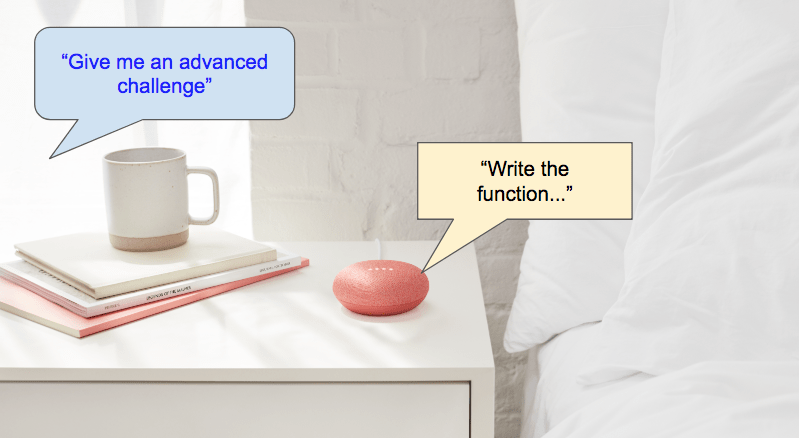
These tools work together to create the following type of interaction:
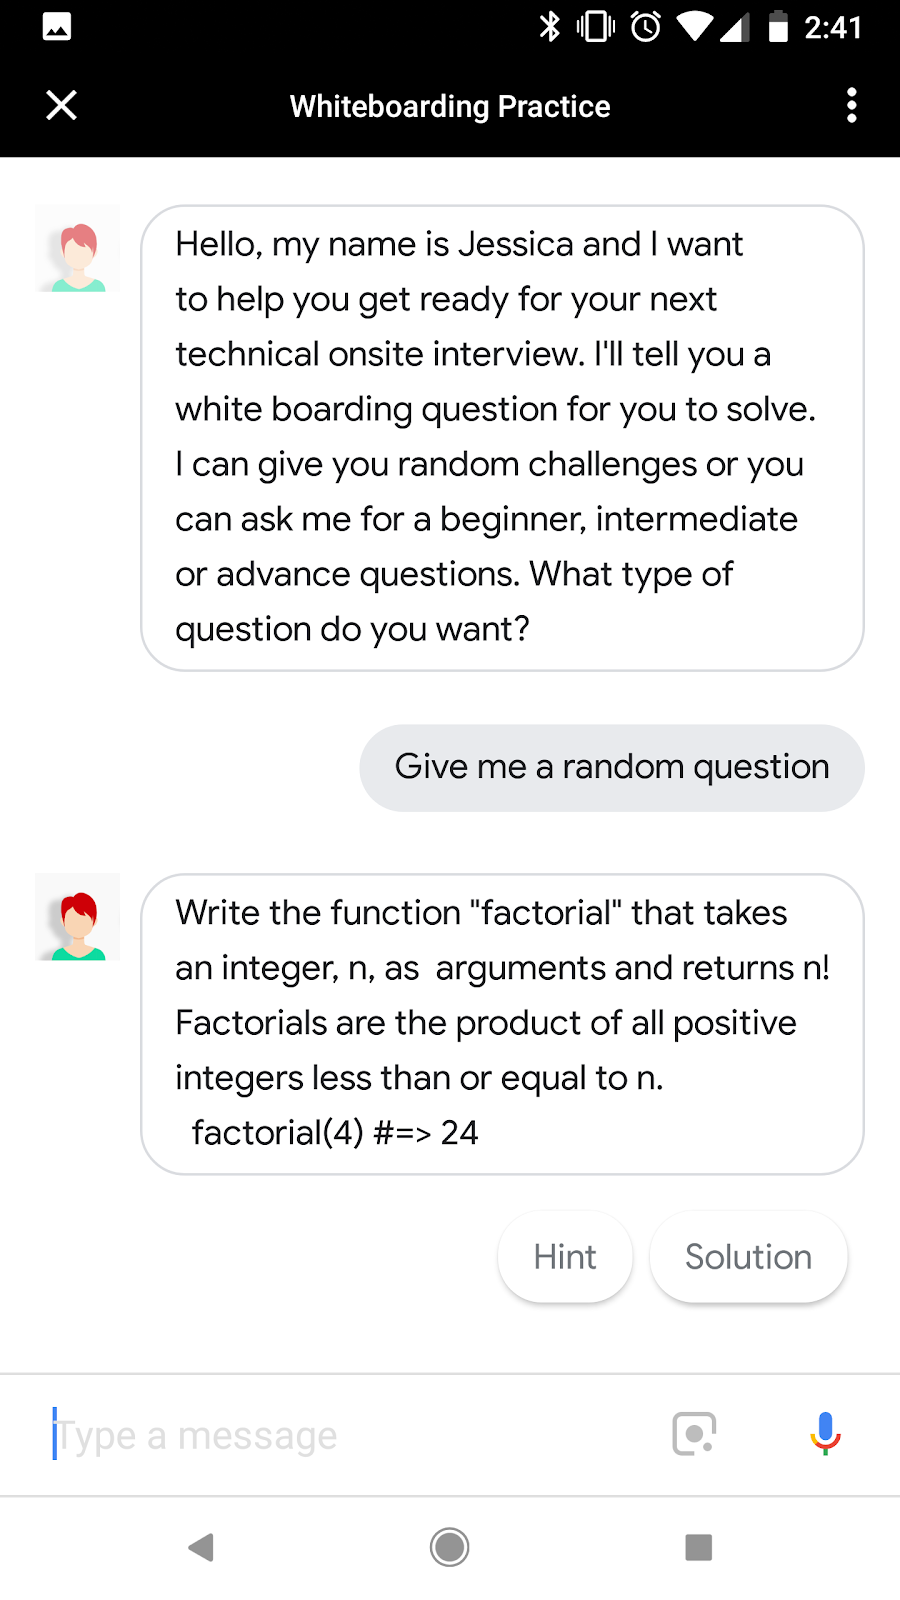
Beautiful, huh?
To give a better understanding of how it was built, let’s walk through what is happening at a high level when the user says “Give me a random question.”
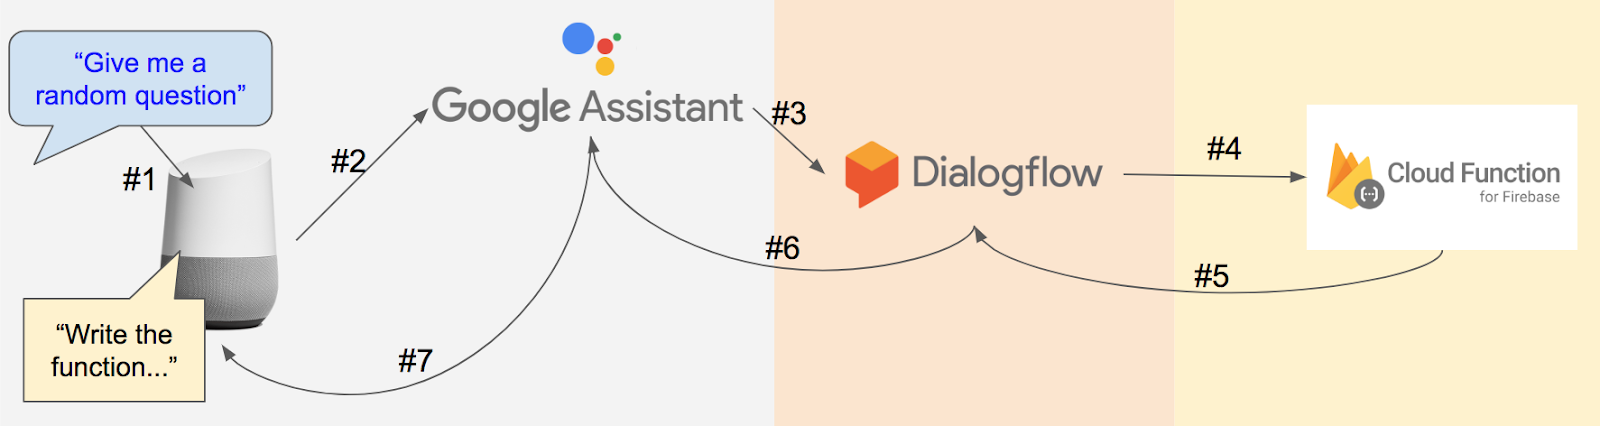
#1 The user says “Give me a random question”
#2 Google Home sends the statement to the Google Assistant
#3 Google Assistant transcribes speech to text
#4 Dialogflow uses Machine Learning & Natural Language Understanding to figure out what the user wants to do (the user’s intent) based on what the developer defines as possible. This example calls the ‘askProblem’ intent
#5 Our backend is called with information for the particular intent, which triggers the function that is associated with the ‘askProblem’ intent. Then, it goes through the code to construct a response for the user and returns the response to Dialogflow
#6 Returns the response to the Google Assistant
#7 Synthesizes text to audio to Google Home, and the Google Home responds to the user
A lot happens between the user’s request and our response, but the actual coding is fairly straightforward when using these tools. Let’s walk through the steps of setting up this Action:
- Conversation Design
- Setup
- Build
- Test
- Deploy
Let’s cover how this was built. Before any coding can happen, we need to build a Conversational Design. I originally had skipped this step because I thought that I could build the structure first and then fill in the content (like building a website). However, the structure is tied in with the content. I realized this when I was hitting walls that I thought were technical, but they were there because I didn’t have a design.
Conversational Design (aka, be better than me)
I highly, highly, highly recommend taking time to build out the Conversational Design (it’ll save so much time in the long run!). Check out the Conversational Design site for all the resources. The main thing that I’d skipped before I stopped and worked on my design was creating a persona.
A persona is the idea of a person that represents your Action — in other words, the ‘front end.’ This idea of a person will influence the personality that’ll be used for your Action. A persona for a game could be similar to a game show host — energetic, happy, and even a little sassy. If you were creating a persona for a Bank action, that persona may be more serious and monotone. For the Whiteboarding Prep Action, I used myself as a model for the persona, which made it so much easier for me to write the responses. For those who don’t know me, I have a teacherly attitude that is very positive and excitable.
I wanted to start out with three options that users could do — be able to ask for a problem, ask for a hint, and, ultimately, get the solution.
By default, you need 6 options for every action:
- Greeting/Welcome — greets the user
- Goodbye/Exit — tells the user bye
- No Input — if the user doesn’t say something
- Fallback — if the user says something that doesn’t match any of your options
- Repeat — a way for users to hear the prompt again
- Help — gives the user information on how to use this Action
So, at minimum, I have 9 options that I need to build out for this Action. I mapped them visually in a flowchart (The Greeting option is automatically trigger and doesn’t get triggered again). In this flowchart, the differently-colored boxes represent different intents that user input can match with, and the dialog in the blue text represents examples of what the user can say that will trigger that option.
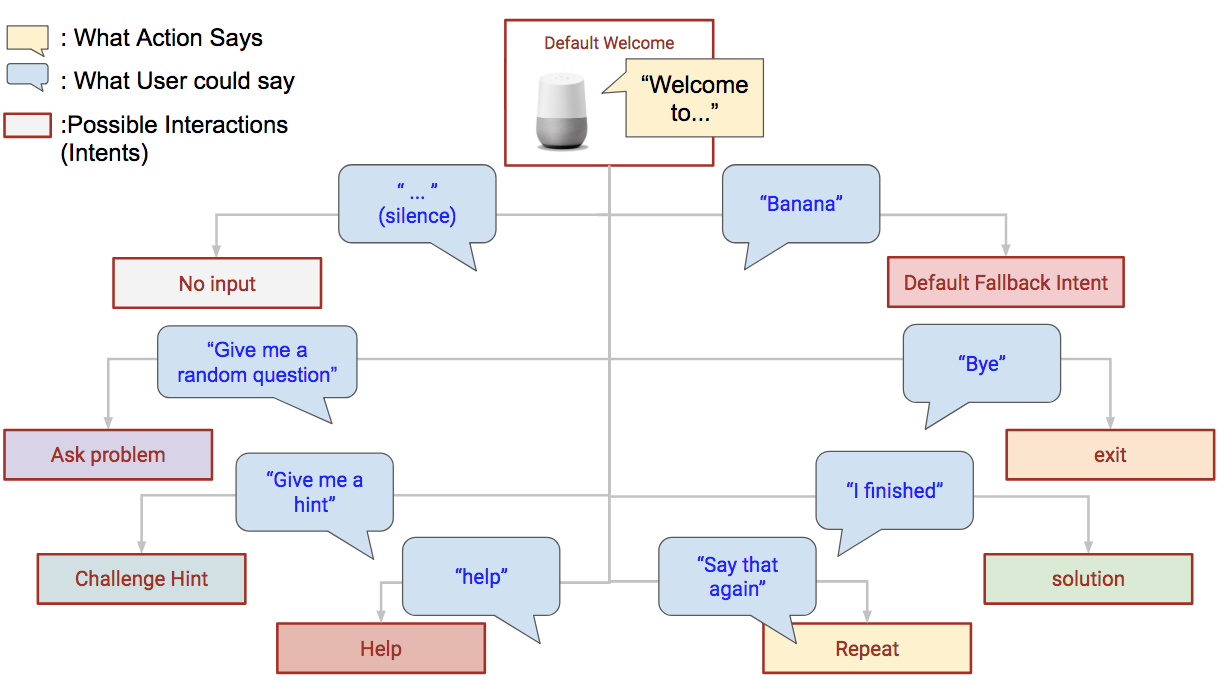
By default, everyone who accesses the Action will receive a Greeting or Welcome. After that, the user can ask for any of these options. So, I wrote sample dialogs for different conversation sessions and mapped it visually:

The Happy Path is the ideal flow for users — the Action greets them, they ask for a problem, the Action gives them one, they ask for a hint, the Action gives them the hint, the user finishes the problem, the Action congratulates them, and the user says they are done. Then, the Action exits.
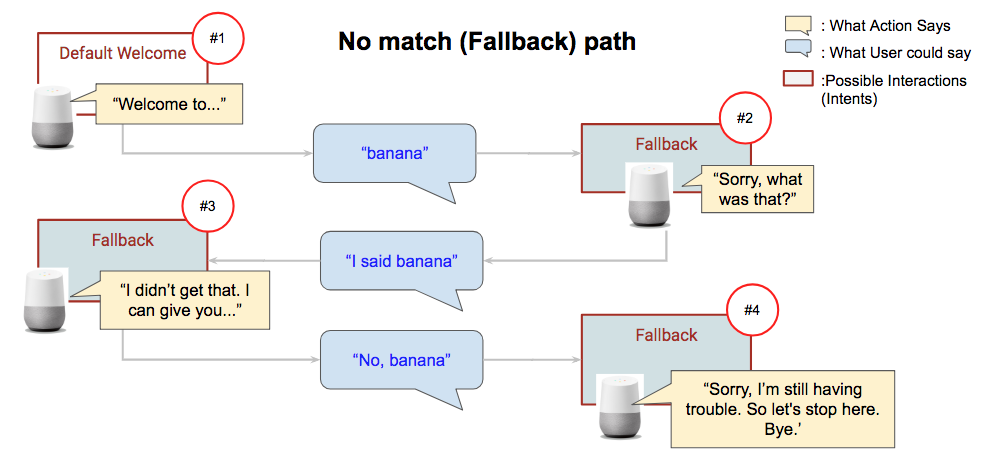
People are complex and different, so not everyone will be able to complete this path their first time. Another sample dialog that I mapped is when a user says something that doesn’t match any of the interactions that we’ve provided. These are normally referred to as No Match or Fallback. When user input isn’t matched the first time, you should try to provide helpful reprompts to get the user back on track. If it happens again, we should let the user know what options they have. Finally, if it happens a 3rd time, we should end the conversation.
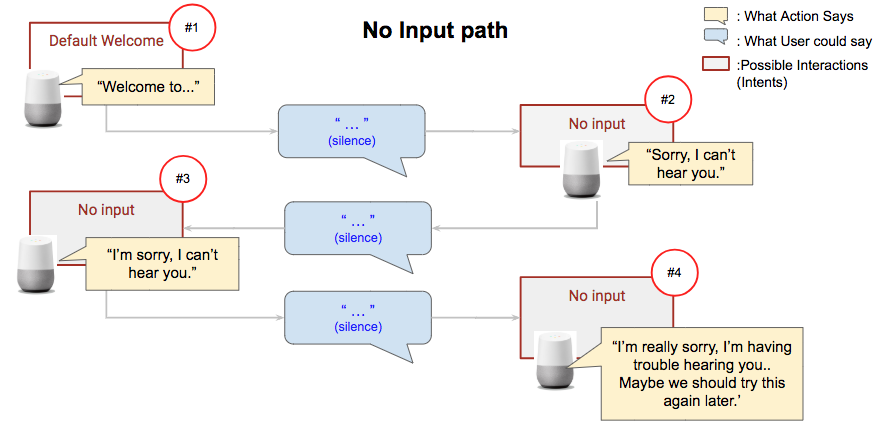
When the user hasn’t said anything or the speaker couldn’t pick up the audio, we’ll consider it as No Input. We’ll want to do something similar to the No Match, where we have 3 levels or responses, but with the angle that the Action did not ‘hear’ them:
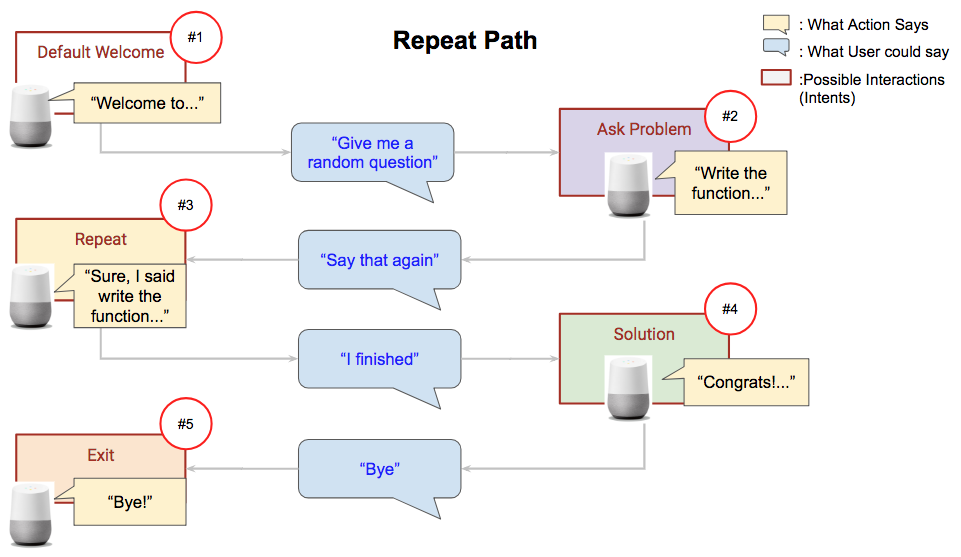
When a user wants the Action to repeat itself, it’s fairly straightforward compared to the prior two paths. If the user asks for something to be repeated, the Action acknowledges it and says the prompt again:
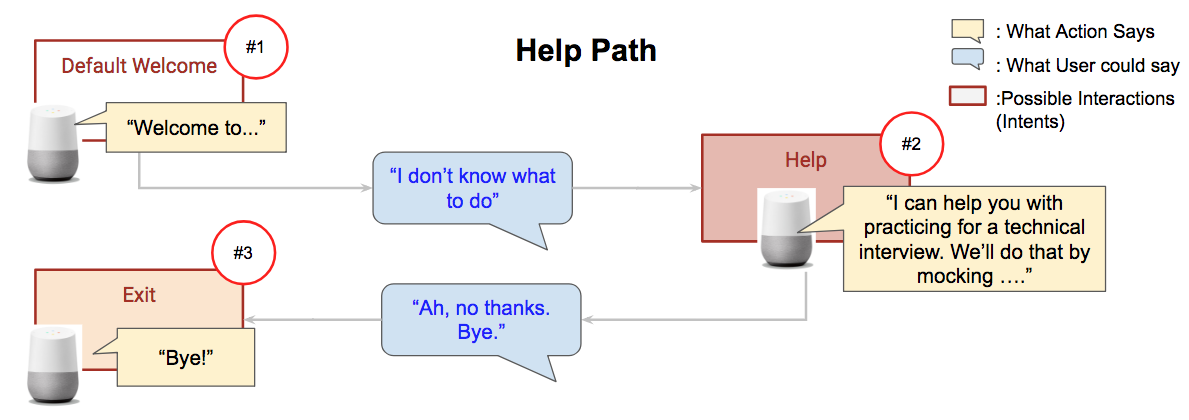
Finally, some users may need more detailed information on what this Action can do and how to interact with it. In this case, a user can say things like “Help”, or “I don’t know what to do”. The Action then tells the user what they can do (but not everything that they can do):
Make sure to check out the Conversation Design site for more. My favorite part of the site is the Conversational Components, because it has several conversational cues that I wouldn’t have thought to include, as well as examples of how to address them.
Check out Building an Action to Solve a Real World Problem: Part 2, Implementation to learn how the Happy Path was built for the Whiteboarding Practice Action.

