This is Part 2 of Building an Action to Solve a Real World Problem: Part 1, Plan & Design, where we designed an Action that mimics a Technical Interview. Below is a sample of the interactions we want to build:

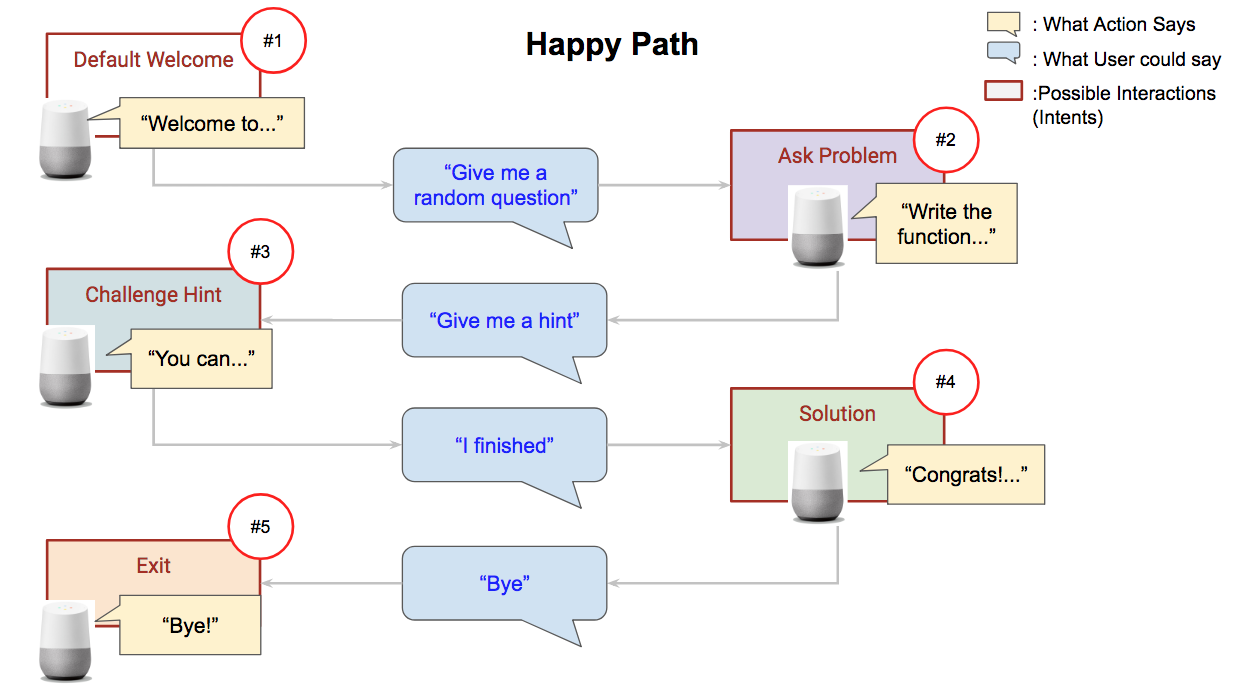
In Part 1, we designed the Happy Path, which is the optimal conversational path. In this flow, the user asks for a question, the Action gives them a question, the user asks for a hint, and the Action gives it to them. The user then says that they are done, and the Action congratulates them. Finally, the user says “bye” and the Action exits:

We’ll now be implementing the Happy Path design, by going through parts 2–5 of the following steps:
- C̶o̶n̶v̶e̶r̶s̶a̶t̶i̶o̶n̶ ̶D̶e̶s̶i̶g̶n̶
- Setup
- Build
- Test
- Deploy
Setup
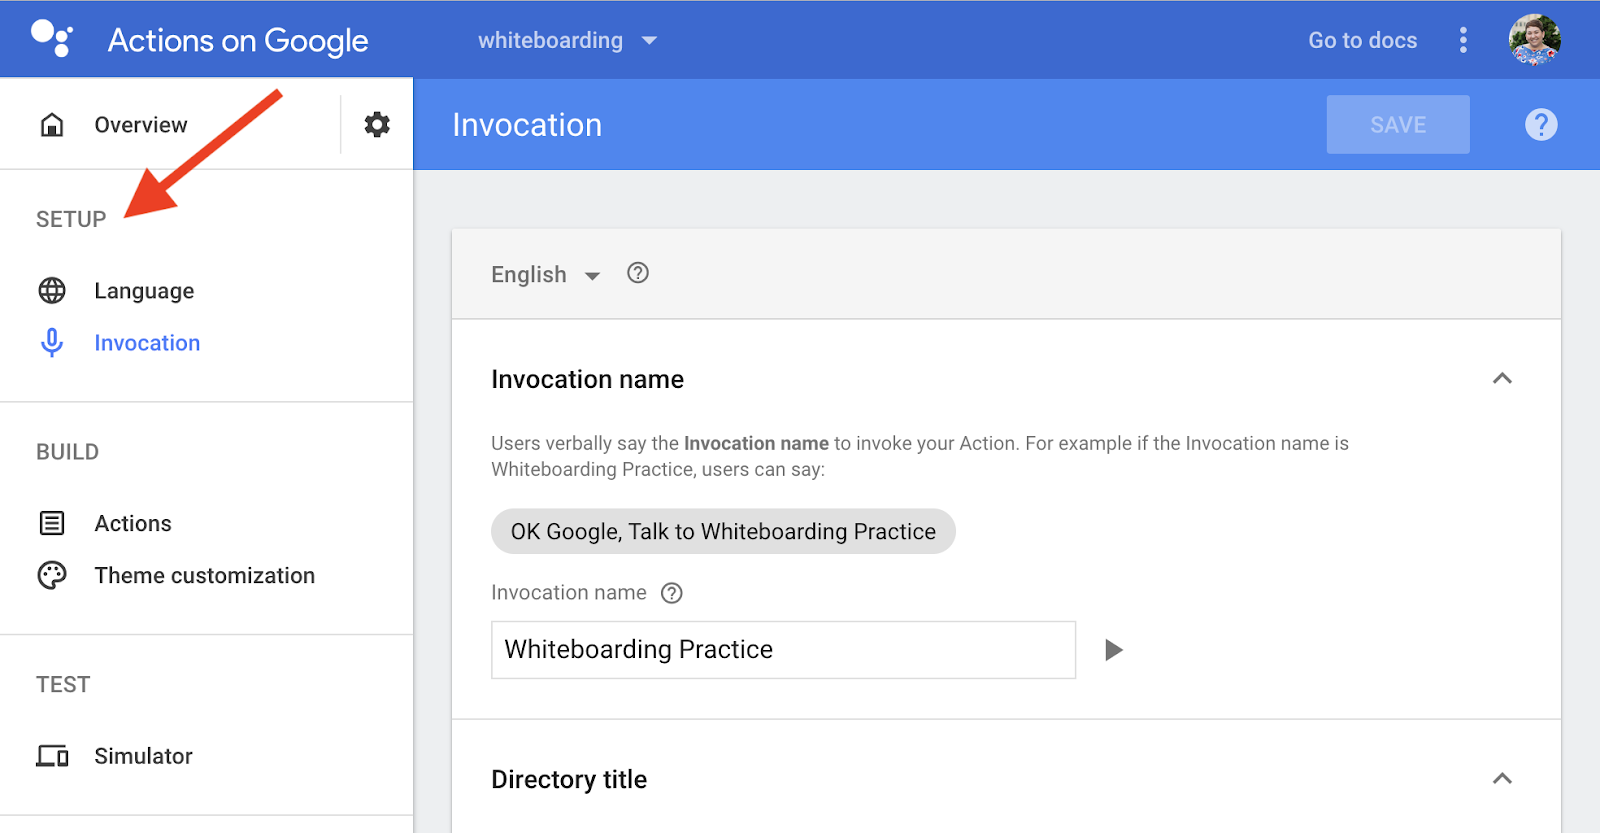
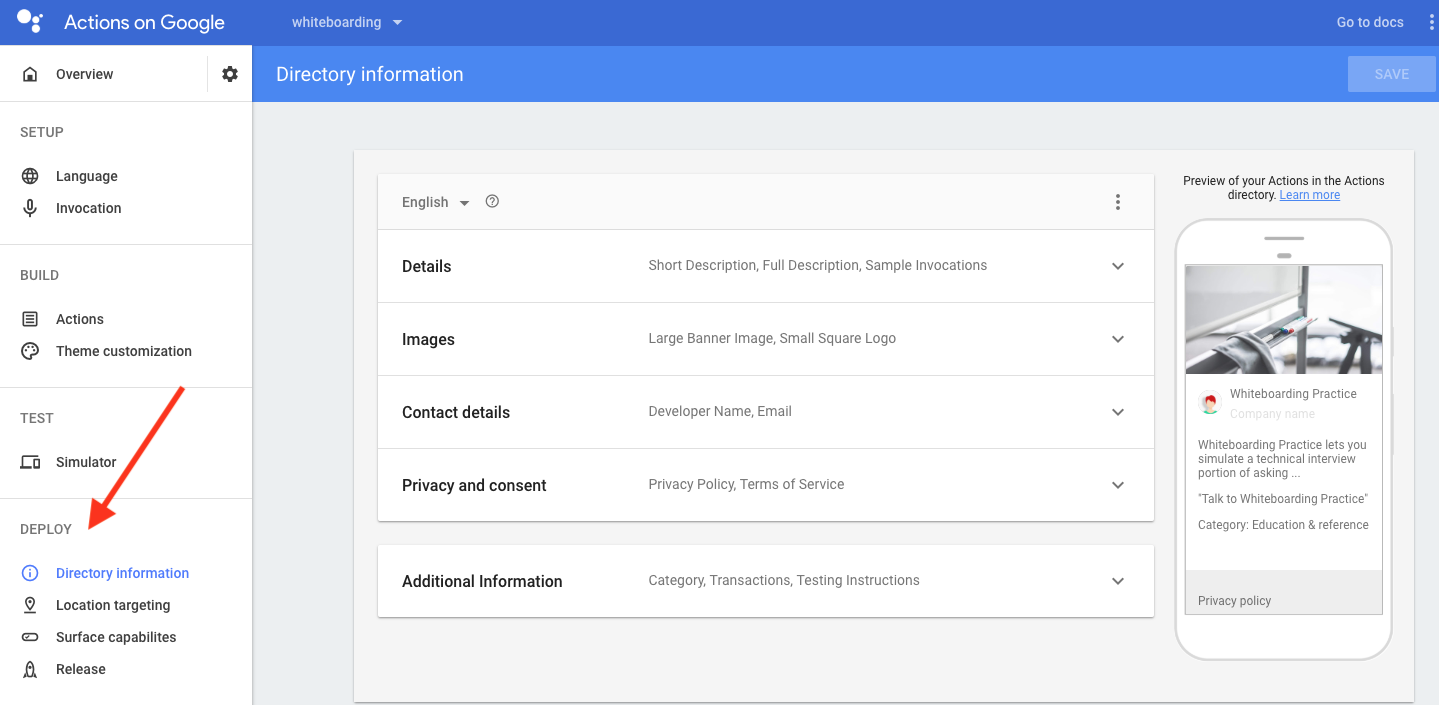
We’ll start building this Action by creating a project on the Actions on Google Console and doing all the Setup steps that are located on the Navigation bar.
The Aᴄᴛɪᴏɴs ᴏɴ Gᴏᴏɢʟᴇ Cᴏɴsᴏʟᴇ manages your Action’s information, workflow, deployment, and more.
Build — Dialogflow
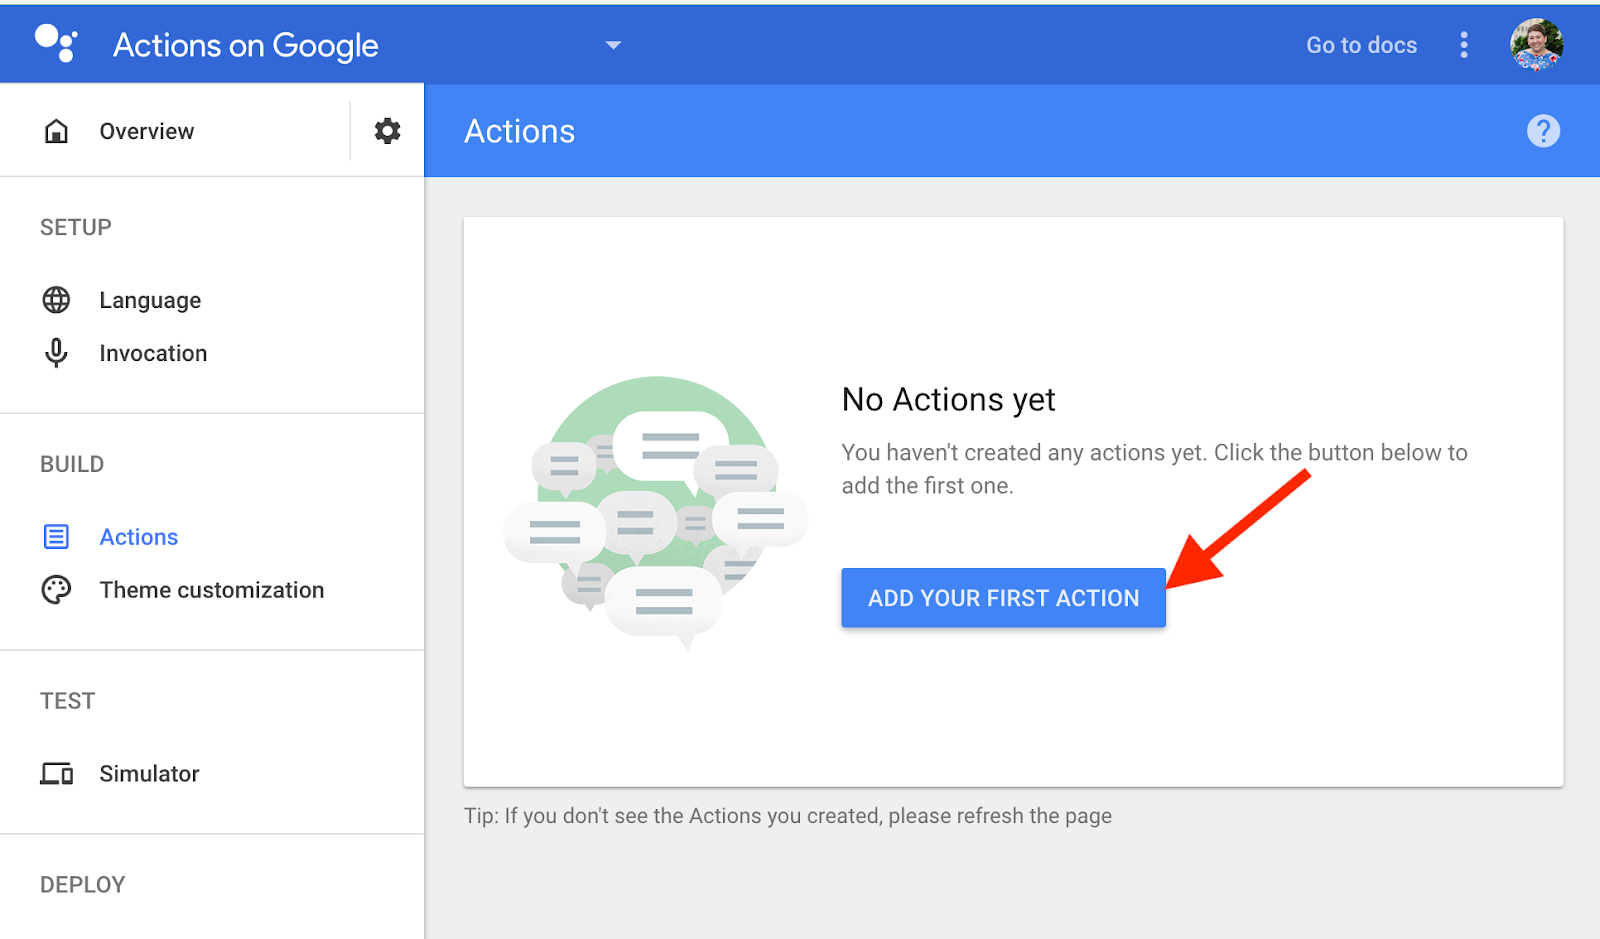
Now, we’ll build the actions that we want this Action to be able to do. In the Navigation bar, under Build, we’ll create our first custom actions. These actions are the different interactions or options that we mapped out earlier in the conversational design. We’ll build each interaction or option individually, so we can test to make sure that everything is working. On the Actions on Google console, we’ll click on Actions on the Navigation bar and click “Add your first Action.”
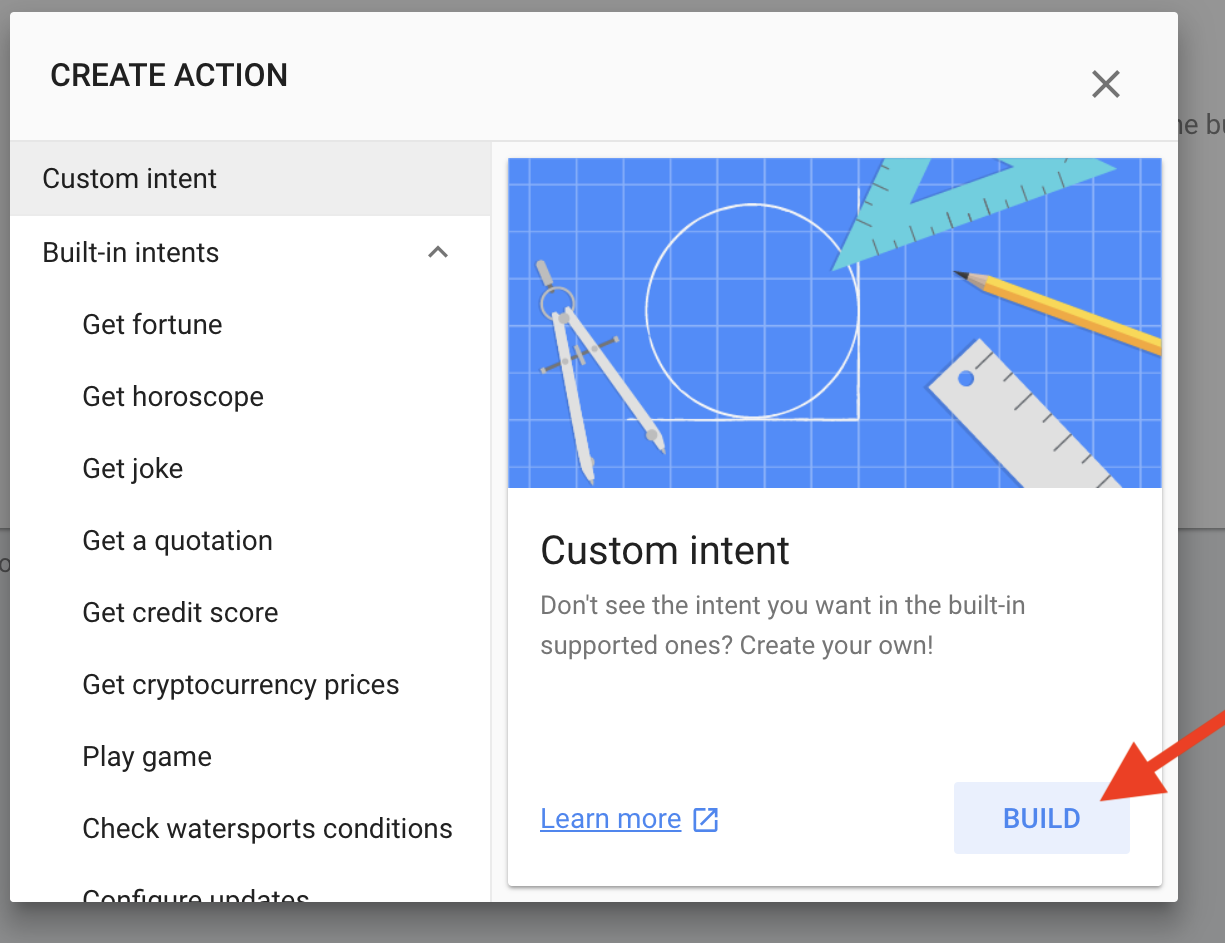
Then we’ll click on Custom Intents and click Build.
This will bring us to the Dialogflow console. All we need to do to create a project in Dialogflow is click Create:
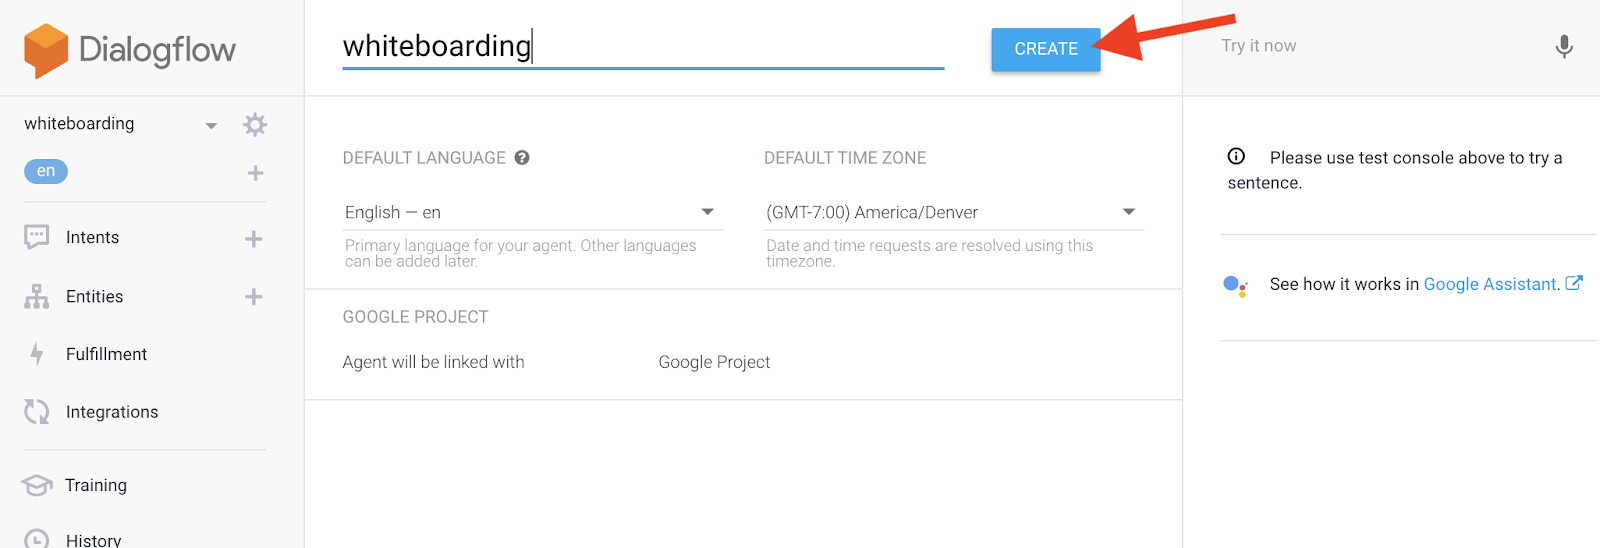
Dɪᴀʟᴏɢꜰʟᴏᴡ will be handling the Natural Language Processing of the raw string that our Action is receiving from the User.
We’ll need to tell Dialogflow all the different options or interactions that we have for this Action. In Dialogflow, these are called intents.
An ɪɴᴛᴇɴᴛ represents a mapping between what a user says and what action should be taken by your code.
This is where the Happy Path diagram comes into play. Dialogflow gives you a Default Welcome Intent and a Default Fallback Intent.
In the diagram below, we’ve mapped out the Happy Path conversational flow. Let’s start with the Welcome Intent which is #1 in the diagram. We’ll need to modify the Welcome Intent in Dialogflow and then build our backend so we can response to the user appropriately.

#𝟭 𝗗𝗲𝗳𝗮𝘂𝗹𝘁 𝗪𝗲𝗹𝗰𝗼𝗺𝗲 𝗜𝗻𝘁𝗲𝗻𝘁
In Dialogflow, go into the Default Welcome Intent. There, you’ll see tons of information. For this intent, the only thing Dialogflow needs to know is how to invoke it. This is done though the Events field, which has already been populated for us.
An Eᴠᴇɴᴛ is a feature that allows you to invoke intents by an event name instead of a user query. For example, the Default Welcome Intent has the Dialogflow Welcome event, which is the general event for when the Action is triggered.

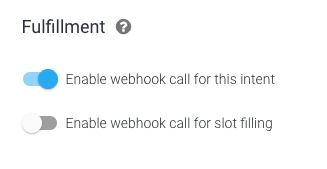
The only thing we’ll do is enable the webhook under Fulfillment. This allows Dialogflow to make a POST request to your server for this intent:
Build — Backend
Now, we need to build out how our backend will process the POST request that Dialogflow sends us. We’ll use the Node.js client library; download the boilerplate code to make it easier. I recommend creating a response.js file where you house all of the actual text responses we’ll be using so it’s separate from your actual code. I recommend this for two reasons: 1) It’ll make your code more readable, and 2) it makes it easier when you add different languages later (by having your responses in a different file, you can translate the responses into different languages and just update the code to distinguish which file to use based on the user).
Let’s continue with the Default Welcome Intent — the boilerplate code gives us the skeleton to start with. It has already defined that we’ll be receiving a convargument for our app.intent('Default Welcome Intent') — convis the conversation object. This object contains the user’s last request as well as other data.
We’ll edit our code so that, when someone uses this Action, it’ll check if we’ve seen the user before. If it’s the first time someone uses it, we give them the grand “Hello, I’m Jessica, this is my purpose, this is what I can do” song and dance. This is similar to real life — when I first meet someone, I tell them a little about me so they get to know who I am. This is also true on the other end — it would be weird to say “Hello, I’m Jessica, I love to collect strawberry knick knacks” to my partner every day. All that person needs is a “Hi.” With the client library, you can use conv.user.last.seento check if we’ve seen them before:
// index.js
const responses = require('./responses');
app.intent('Default Welcome Intent', (conv) => {
  // the user has used this Action prior, let's give them the
  // returning greeting
  if (conv.user.last.seen) {
    // the choose function is something that I wrote to return
    // a list of random elements
    let message = choose(responses.greeting['returning'])[0];
    // creates an instance of a Simple Response and passes our
    // message information
    conv.ask(new SimpleResponse({
      speech: message['speech'],
      text: message['text'],
    }));
    // provides suggestion chips for visual displays
    conv.ask(new Suggestions(
        choose(responses.commmonSuggestions, 2)
    ));
  // a new user, woot! Let's give them the new user greeting
  } else {
    let message = responses.greeting['new'][0];
    // creates an instance of a Simple Response and passes our
    // message information
    conv.ask(new SimpleResponse({
      speech: message['speech'],
      text: message['text'],
    }));
    // provides suggestion chips for visual displays
    conv.ask(new Suggestions(
        choose(responses.commmonSuggestions, 2)
    ));
  }
//responses.js
export.greeting = {
  'new': [
    {'text': 'Hello, my name is Jessica…',
    'speech': '<speak> Hello, <break time=".35 /> my name…',
    },
  ],
  'returning': [
    {'text': 'Hi again! I'm excited to help…',
    'speech': '<speak> Hi again! I'm excited to help…',
    },
  ],
};
conv.ask()is how we send a response back to the user with the intention that the conversation will continue (there is a way to end conv.close()). This takes in different types of responses, like SimpleResponse.
SimpleResponse are objects that take in your message for the user and give it to the user for audio-only devices, screen-only devices, and for devices that have both. This is helpful because you don’t have to worry about devices. This object also lets you use SSML.
SSML is Speech Synthesis Markup Language.With SSML, you can alter the characteristics of the voice, like adding pauses and additional sounds to create a rich experience.

Suggestion Chips are for display screens only. These are short options that the user can click on to invoke an intent.
Build — Cloud Functions — Firebase
Fantastic! We have finished modifying Intent #1 — the Default Welcome Intent. Let’s use Cloud Functions — Firebaseto have this code run on the cloud. We’ll follow the instructions from the boilerplate code’s README.md file( Option 2: Dialogflow restore and Firebase CLI, step 5–7.) If you want more info about these steps, check out the video Getting Started with Cloud Functions for Firebase using TypeScript — Firecasts, where Doug explains using Cloud Functions.
Test
Now, we’ll make sure that our Default Welcome Intent works. Go to the Actions on Google console. In the Navigation Bar under TEST, go to the simulator and try it out by typing “Talk to Whiteboard Practice” or “Talk to Test App”:
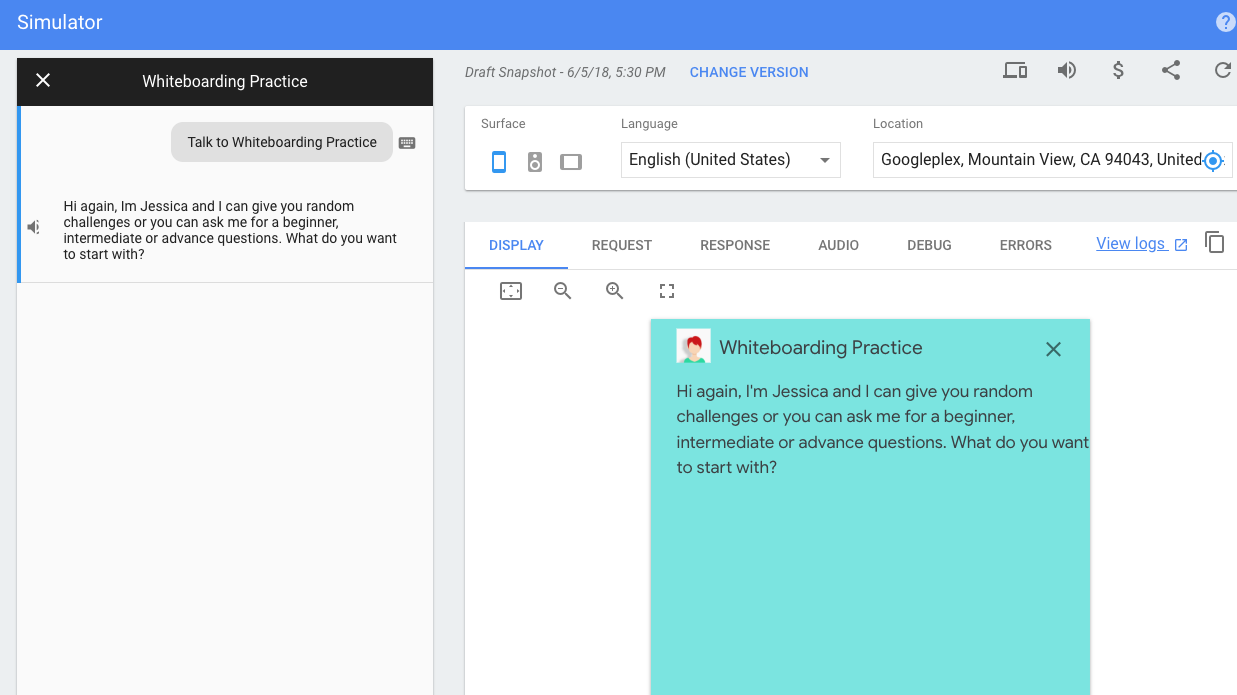
Success!
If you’re anything like me, you most likely got an error. The most common error is the MalformedResponse error, as shown below:
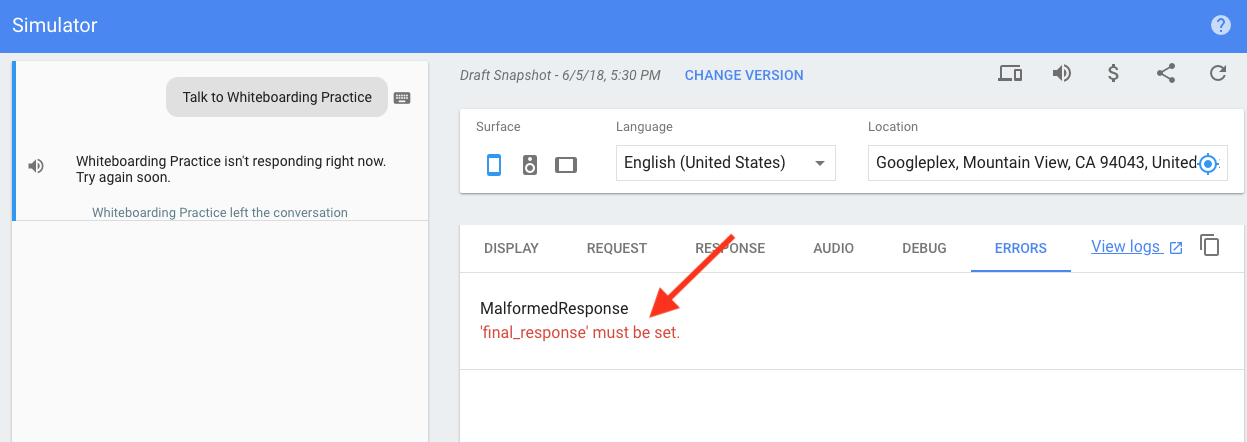
You can see the Request & Response for this. In the Response object, there is a message that says that Dialogflow wasn’t able to parse the response because it was empty. That means that my server didn’t give Dialogflow the response that I created.

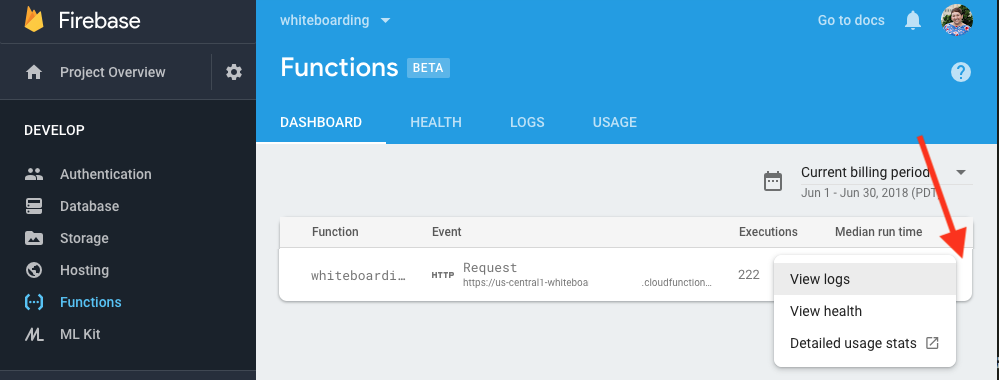
Hmm. Most likely I have a bug in my code, but where? You can go to the Firebase console and check out the logs. Go to your project. On the Navigation bar, go to Functions — your Cloud function should be there. Click on the three dots on the right and select View logs:
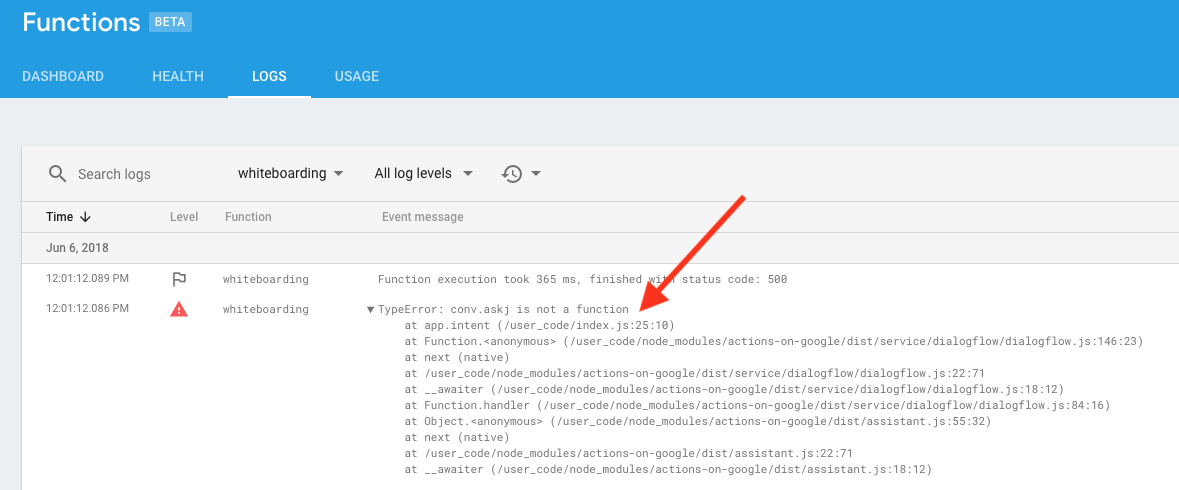
It looks like I have a TypeError — on line 25, I put conv.askj. Oops! That’s embarrassing. Between the Simulator’s Response and the Firebase logs, I can debug the majority of my problems.
Cool. Now, let’s walk through building our next intent.
#𝟮 𝗔𝘀𝗸 𝗣𝗿𝗼𝗯𝗹𝗲𝗺
Build — Dialogflow
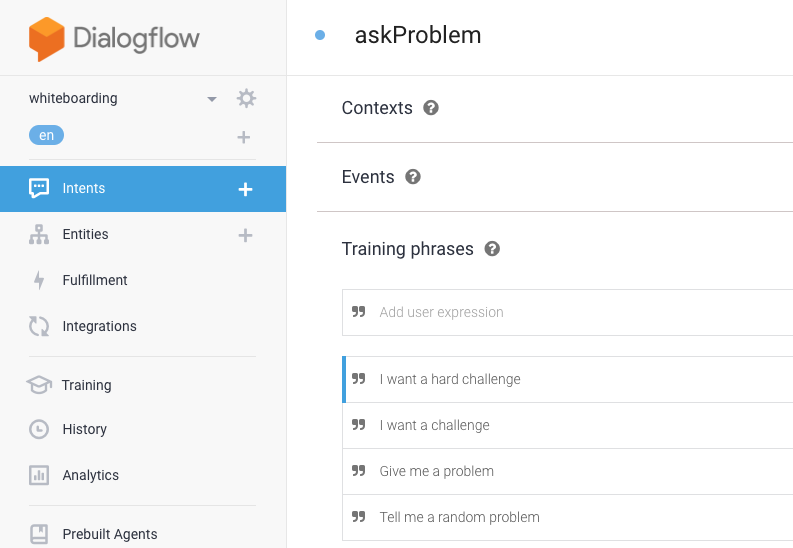
In Dialogflow, we’ll create an intent and call it askProblem. For this intent to be invoked, the user needs to say something like “Give me a random problem.” So, we’ll add examples like this to the Training phrases field.
Tʀᴀɪɴɪɴɢ ᴘʜʀᴀsᴇs are natural language examples of what a user can say to invoke this intent. The more phrases provided, the more accurately your agent can match user input to the intent.
These training phrases are generally fine, but we do want to be able to give users the ability to ask for an easy, medium, or hard problem. We need to tell Dialogflow about these levels so that, if someone invokes this intent and provides that information, we can give them the correct level in our code. So, instead of continuing with creating this intent, let’s cancel (just click on Entities and Dialogflow will ask you if you are sure) and create an entity. We can find the Entities tab on the navigation bar.
Entities extract parameter values from natural language inputs. For example, If you define an entity that corresponds to levels, your Dialogflow agent can recognize if the user states a preferred problem difficulty, extract it and send it as a parameter on the conv object.
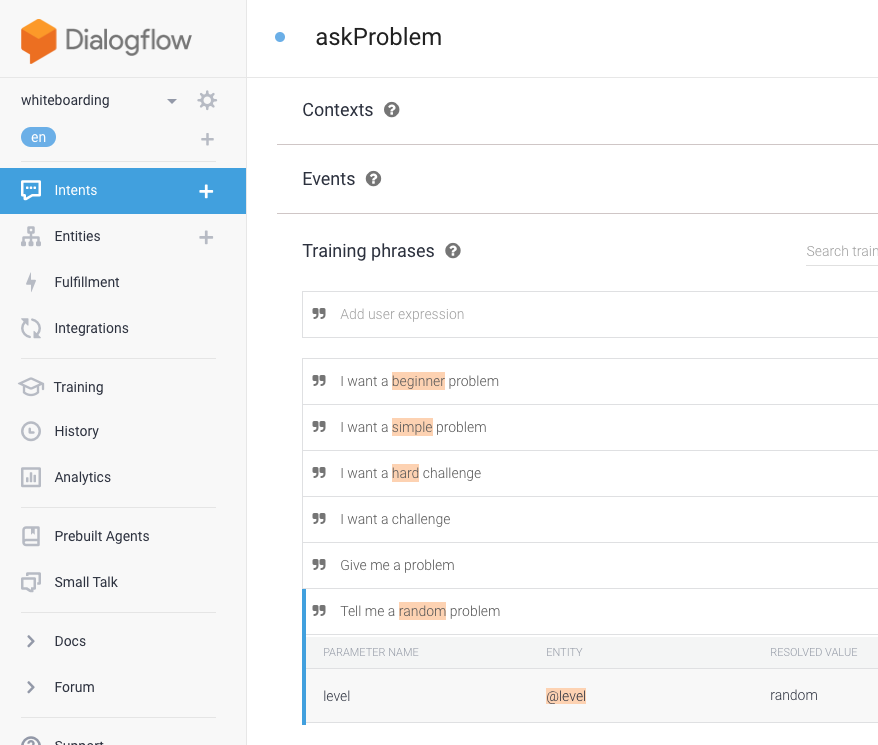
We’ll make an entity called ‘level’. The name of the entity is the parameter name that we’ll receive when Dialogflow sends a POST request to our server. There are 4 types of levels that we want to provide: easy, medium, hard, and random. Each of these levels could be expressed in different ways, and Dialogflow provides a space for synonyms of the values. This makes it so much easier for us in the code — if someone says “I want a simple problem” or “I want a beginner problem”, Dialogflow sends a POST request to the server that specifies that the user is invoking the askProblem intent with the parameter level having the value of “easy.”

Now, let’s go back to building the askProblem intent. Whenever the entity or its synonym is mentioned in your training phrase, it’s automatically highlighted:
When it comes to training phrases, the more you define, the better. It’s recommended to provide at least 10 training phrases to start off with.
Like we did with the Default Welcome Intent, we need to enable the webhook under Fulfillment. This allows Dialogflow to make a POST request to your server for this intent along with the provided ‘level’ parameter.

Build — Backend
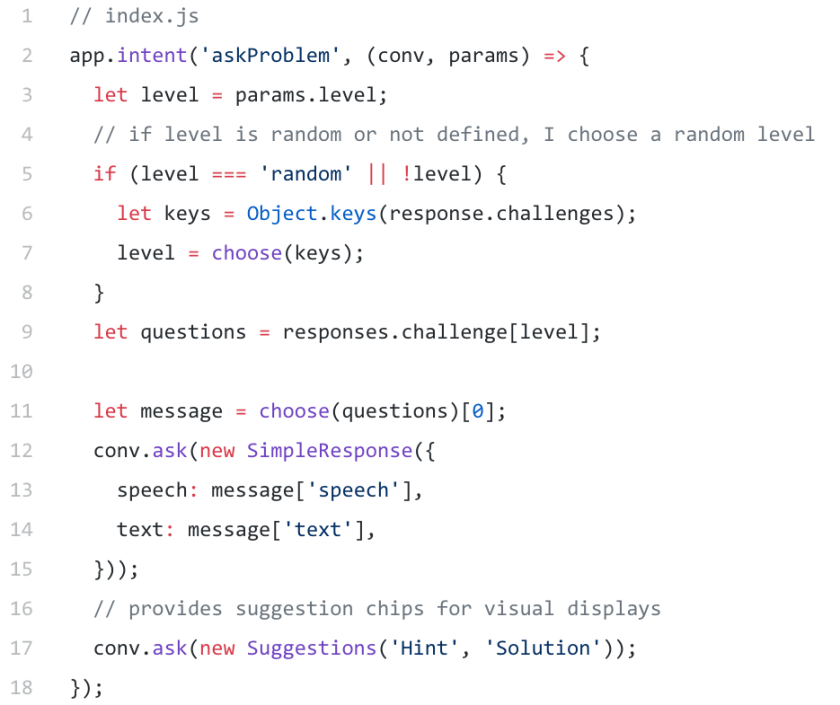
The biggest difference between the Default Welcome Intent and the askProblem intent is that we get two arguments: conv & params. The object params contains as attributes all the parameters that were defined in Dialogflow for this intent. Because we are using the client library, its super easy to access params.level.
// index.js
app.intent('askProblem', (conv, params) => {
  let level = params.level;
  // if level is random or not defined, I choose a random level
  if (level === 'random' || !level) {
    let keys = Object.keys(response.challenges);
    level = choose(keys);
  }
  let questions = responses.challenge[level];

  let message = choose(questions)[0];
  conv.ask(new SimpleResponse({
    speech: message['speech'],
    text: message['text'],
  }));
  // provides suggestion chips for visual displays
  conv.ask(new Suggestions('Hint', 'Solution'));
});
// responses.js
beginnerChallenges = [
  {
    'problemName': 'matching_parens',
    'text': 'Write the function …',
    'speech': '<speak> Write the function…',
    'hintText': 'If you remove all the letters…',
    'hintSpeech': '<speak> If you remove all the letters…',
  },
  ...
];
intermediateChallenges = [
  {
    'problemName': 'count_vowels_in_file',
    'text': 'Write the function …',
    'speech': '<speak> Write the function…',
    'hintText': 'If you remove all the letters…',
    'hintSpeech': '<speak> If you remove all the letters…',
  },
  ...
];
advanceChallenges = [
  {
    'problemName': 'friend_suggestions',
    'text': 'Write the function …',
    'speech': '<speak> Write the function…',
    'hintText': 'If you remove all the letters…',
    'hintSpeech': '<speak> If you remove all the letters…',
  },
  ...
];
exports.challenges = {
  'easy': beginnerChallenges,
  'medium': intermediateChallenges,
  'hard': advanceChallenges,
};
Build — Cloud Functions — Firebase
Push your changes up to your Cloud Function — Firebase:
$ firebase deploy — only functions
Test
Now, it’s time to test this functionality in the console.

#𝟯 𝗖𝗵𝗮𝗹𝗹𝗲𝗻𝗴𝗲 𝗛𝗶𝗻𝘁 & #𝟰 𝗦𝗼𝗹𝘂𝘁𝗶𝗼𝗻
Build — Dialogflow
I hope that the flow of how to build out an intent is becoming clearer. We’ll create both intent #3 (Challenge Hint) & #4 (Solution) at the same time. In Dialogflow, we’ll need to create these intents, give them training phrases, and enable the webhook fulfillment.
Build — Backend
Now, we need to give the user a hint for the problem they have. Um….. how do we pass information from one point of conversation to another? Dialogflow has a feature called Context, which keeps track of what the user has requested for possible reference later. This sounds like something we would want. However, for audio only devices, the conversation is going to end because it’ll time out while the user is working on solving the problem. Because of this, I need to update my list of intents to include something like ‘workingOnProblem.’ This intent would mainly be for the audio-only devices. That way the user can say something like, “I’m working on it” and the Action will respond back with a message like “Take your time, I’ll end our conversation here. Just say “Okay Google Talk to Whiteboarding Practice” for a hint or the solution, bye!” So, I need to be able to store the question beyond this conversation, where I can access it in future conversations.
We can use conv.user.storage to store data across conversations. I chose to use this because 1) it’s not personal data, and 2) I am only storing two strings. If I wanted to save all the problems that the user has received, I wouldn’t use this option (at that point, I should just have a database). So, we’ll need to add the level and the current challenge name to the askProblem intent:
conv.user.storage.currentLevel = level;
conv.user.storage.currentChallenges = message[‘problemName’];
Now, for our challengeHint intent, we can get the level and the challenge name and use a function, findQuestion, to get the correct question’s hint. We’ll also need to plan for the possibility that someone asks for a hint without actually having a question.
// index.js
app.intent('challengeHint', (conv) => {
  // get the data that is saved on the user
  let challengesName = conv.user.storage.currentChallenge;
  let level = conv.user.storage.currentLevel;
  // if they don't have a challengeName, then we tell them a
  // message
  if (!challengeName){
    conv.ask(new SimpleResponse({
      speech: noChallengeresponse['speech'},
      text: noChallengeresponse['text'],
    }));
    conv.ask(new Suggestions(
      choose(responses.commmonSuggestions, 2)
    ));
  } else {
    // figures out which question the user is on
    let question = findQuestion(level, challengesName);
    // sends hint to user
    conv.ask(new SimpleResponse({
      speech: question['hintSpeech'],
      text: question['hintText'],
    }));
    conv.ask(new Suggestions('Solution', 'Repeat Problem')
    );
});
For the solution, we’ll do something similar. However, for devices with a screen, I want to give them a basic card with the link to my Github repo. If the user doesn’t have a display, I still congratulate them, but tell them that they’ll need to use a screen device to see the solution. We can do this with the conv.screen to check if the user has a screen.
//index.js
app.intent('solution', (conv) => {
  let message = choose(responses.solutions)[0];
  // if the user doesn't have a screen, give them only the
  // message plus info about getting url via a screen
  if (!conv.screen){
    conv.ask(message['text'] + ' To see the url switch ' +
      'over to a screen');
    return;
  }
  conv.ask(new SimpleResponse({
    speech: message['hintSpeech'],
    text: message['hintText'],
  }));
  // creates a card with a photo and a link
  conv.ask(new BasicCard({
    title: 'Github Repo',
    buttons: new Button({
      title: 'Go to Solution',
      url: github + challengesName + '/' + challengesName +
        '.md',
    }),
    image: new Image({
      url: celebrationImg,
      alt: 'Image of balloons or fireworks',
    }),
  }));
  conv.ask(new Suggestions('Solution', 'Repeat Problem')
  );
});
Build — Cloud Functions — Firebase
Push your changes up to your Cloud Function on Firebase:
$ firebase deploy — only functions
Test
Make sure to test this functionality in the console!

#𝟱 𝗘𝘅𝗶𝘁
Build — Dialogflow
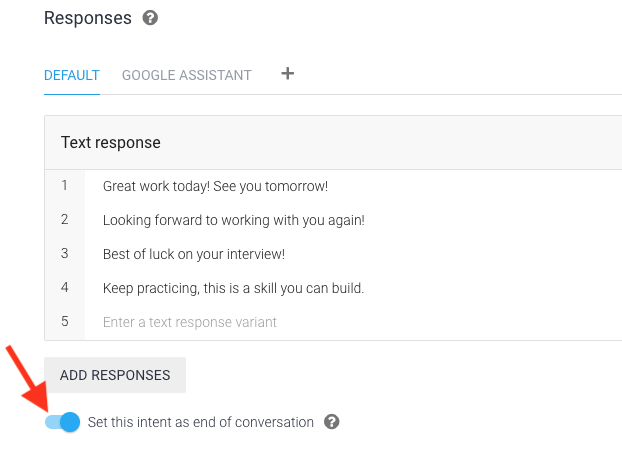
This one is super easy! All we need to do is create an exit intent in Dialogflow with its corresponding training phrases. Instead of using our backend (enabling the fulfillment), we can use the Response option. All we need to do is add the different messages — Dialogflow will randomly choose one. Once we’ve entered the responses, change the toggle next to “Set this intent as end of conversation.” When this is enabled, this intent ends the conversation.
Test
It may feel like we didn’t do much, but you should still test this functionality in the console!
Cool! We now have all the functionality we want for our happy path. Woot!
We’ll need to build out the rest of the intents and test them out. For fallback and repeating intents, you can check out the General Best Practices page on strategies. Once you’ve gotten all the functionality and experience you want, you’ll want to deploy through the Actions on Google console.
Enter all the information requested and submit it for review. While you’re waiting, you can start working on creating tests for your Action by learning about our Testing Library. Once it’s approved, the Action is available on over 500 million devices! I hope that my Action can help others practice their whiteboarding skills and get a fantastic job! If you want to contribute to adding problems or solution, add them to this GitHub repo. To use this Action just say “Okay Google, Talk to Whiteboarding Practice.”

